My Perfect Japanese Vanilla or Strawberry Melon Pan メロンパン
Posted by admin on
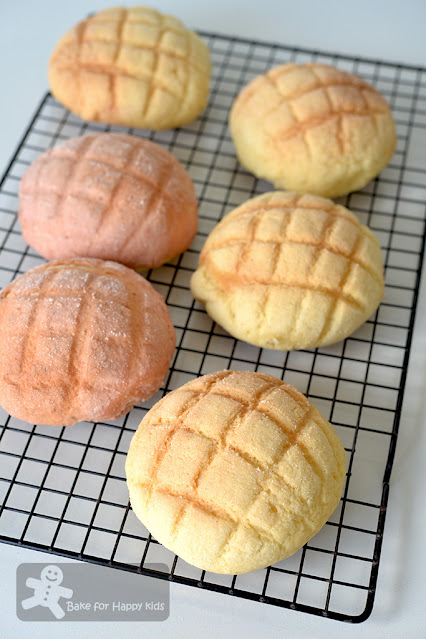
Melon pan (also known as ロンパン in Japanese, meronpan, melon bun or melon bread) is a Japanese classic sweet bread that looks like a melon or cantaloupe.
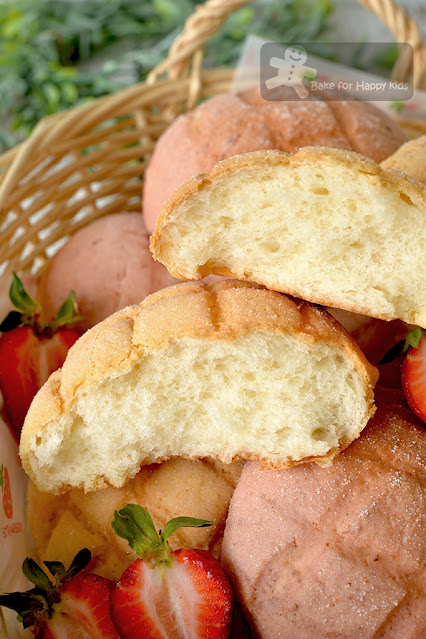
I like melon pan and tasted many from different bakeries. To me, an ideal melon pan must have a sweet crunchy and cookie-like crust and the bread inside must be soft and fluffy.
Some people think pineapple polo buns are the Chinese version of Japanese melon pan. Or vice versa. Nay!!! I don't think so. And I will tell you why...
You can bake these perfect melon pans too! Watch my video and follow the steps in my recipe.
Make 12 buns
For the bread dough:
180g lukewarm water, at about 37°C
50g egg (about 1 egg without the shell) - please use exact weight
320g strong bread flour with 12% protein
20g milk powder - please do not replace this and water with milk.
25g caster sugar
2g salt
50g unsalted butter, soften at room temperature
1 tsp instant dry yeast
extra bread flour for dusting and shaping
If you are using a breadmaker to knead and prove, add all ingredients into the breadmaker according to this order. Use "dough" setting to mix and knead dough for 30 mins or until the dough is smooth and elastic and allow the dough to prove for 1 hr.
If you are using an electric mixer with an hook attachment to knead, combine all ingredients except butter in the mixing bowl and mix at low speed until a soft dough forms. Then, knead in the butter until incorporated. Continue to knead at low speed for at least 25 mins or until the dough is smooth and elastic. It is important that the dough has to be elastic and stretchy. Cover the dough and allow the dough to prove in a warm and humid place for about 1 hr or until doubled in size.
While the dough is proving, prepare melon topping.
Bake in a preheated 180°C (350°F) oven with one tray at a time for 15 mins or until the breads are thoroughly baked and the topping is firm, lightly brown and crisp.
Transfer immediately onto a wire rack to cool completely before serving. These buns are the best on the day they are freshly baked.
Happy Baking
Please support me and like me at Facebook...
I like melon pan and tasted many from different bakeries. To me, an ideal melon pan must have a sweet crunchy and cookie-like crust and the bread inside must be soft and fluffy.
Some people think pineapple polo buns are the Chinese version of Japanese melon pan. Or vice versa. Nay!!! I don't think so. And I will tell you why...
What are the differences?
Don't know anything about Custard Polo Buns / Hong Kong Pineapple Buns 菠蘿包? Please check out my bake and recipe at HERE.
1) Texture and Taste
The cookie topping on the Japanese melon pan is typically firm, crunchy with a cake-like taste whereas the cookie topping on the Chinese pineapple polo buns are buttery, tender, flaky pastry-like with a nice custard taste.
2) More Flour
The melon pan topping dough is so much easier to handle because it is made with twice amount of flour (200g) as compared to the amount added to make the pineapple polo topping dough (100g) even though the amount of butter used for both (60g) are the same.
3) Whole Egg
Unlike the pineapple polo topping, the melon pan topping contains 1 whole egg instead 1 egg yolk, causing the the topping to be firmer and not pastry-like. Plus, no egg wash is required for baking the melon pan.
4) More Sugar
More sugar is required to make the melon pan cookie topping firmer and crunchy. Plus, the topping must be coated with sugar before scoring the topping with criss cross pattern.
5) The Shaping procedure
The melon pan are shaped with their toppings before the final proof. In contrast, the polo toppings were placed onto polo buns after the final proof.
To be honest, I didn't like the idea of shaping the bread with the topping because I feel that the cookie topping kinda restrict the bread from rising optimally. And the topping will to spread and crack when the bread expand during proving and baking.
Hence, using the right composite of ingredients to make the melon topping is critical.
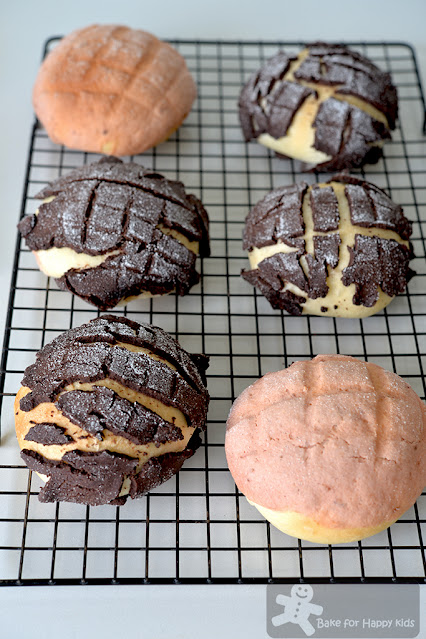
In my video, you will see that I tried baking the strawberry and chocolate melon pan by adding strawberry jam or cocoa powder into the plain vanilla melon topping dough. Yes that this simple straightforward addition works for strawberry melon pan but not for the chocolate ones. We could taste the strawberry in our strawberry melon pan but it is subtle because it is made with natural ingredients, not flavouring.
I'm pretty sure that the melon pans that are made with the real melon juice will smell and taste subtle like our homemade melon pans, as compared to the strong smelling ones that are made with artificial flavours.
This is why I'm an advocate of home baking. I can bake with good quality natural ingredients and the right amount of sugar to make my melon pan ideally sweet and crunchy yet not excessively sweet.
 |
| Using the right composite of ingredients to make the melon topping is critical! I can bake these perfect vanilla and strawberry melon pan. |
 |
|
Yes... I can proudly say my vanilla and strawberry melon pans are perfect! Their cookie-like crust are just sweet and crunchy And the bread inside is super soft and fluffy! |
You can bake these perfect melon pans too! Watch my video and follow the steps in my recipe.
Music: Bensound
Happy that I have succeed, failed and learned from this bake. Although I have not managed to bake any decent chocolate melon pans here, I have managed to create an ideal chocolate melon pan recipe and will share the recipe with you soon... So please stay tune if you are interested. Please don't be like my son who can't stop laughing at my ugly cracking chocolate melon buns but ate all of the buns eventually. These guys only know to ridicule me yet still eat all the food that I cooked and baked. Boys will be boys... LOL!
If you would like to bake Custard Polo Buns / Hong Kong Pineapple Buns 菠蘿包, you may wish to know that my reduced sugar and butter recipe is at HERE.
Like my baking tips, video and recipes? Please support me! Please LIKE, SHARE and FOLLOW my Facebook at here or here or my Instagram @zoebakeforhappykids or SUBCRIBE my YouTube channel at here. Your LIKE, SHARE, FOLLOW and SUBSCRIBE mean a lot to me and will keep me motivated and share more of my tried-and-tested recipes in the future.
Here's the recipe.
Make 12 buns
For the bread dough:
180g lukewarm water, at about 37°C
50g egg (about 1 egg without the shell) - please use exact weight
320g strong bread flour with 12% protein
20g milk powder - please do not replace this and water with milk.
25g caster sugar
2g salt
50g unsalted butter, soften at room temperature
1 tsp instant dry yeast
extra bread flour for dusting and shaping
If you are using a breadmaker to knead and prove, add all ingredients into the breadmaker according to this order. Use "dough" setting to mix and knead dough for 30 mins or until the dough is smooth and elastic and allow the dough to prove for 1 hr.
If you are using an electric mixer with an hook attachment to knead, combine all ingredients except butter in the mixing bowl and mix at low speed until a soft dough forms. Then, knead in the butter until incorporated. Continue to knead at low speed for at least 25 mins or until the dough is smooth and elastic. It is important that the dough has to be elastic and stretchy. Cover the dough and allow the dough to prove in a warm and humid place for about 1 hr or until doubled in size.
While the dough is proving, prepare melon topping.
For the melon topping:
60g unsalted butter, softened at room temperature
80g icing sugar, sifted - Do not reduce this essential amount.
1 tsp vanilla paste or extract
50g egg (about 1 egg without the shell) - please use exact weight
200g cake flour with 8% protein
1/2 tsp baking powder
Variations:
To make 4 strawberry melon toppings, mix in 1 tbsp strawberry jam and a few drops of natural pink colouring into one-third (130g) of the above plain vanilla topping. Knead in 10g cornflour or less if dough is too sticky. Do not add more than 10g cornflour because dry topping dough is less stretchable causing the topping to crack after proving and baking.
To make 12 strawberry melon toppings, mix in 3 tbsp strawberry jam and a few drops of natural pink colouring into all of the above plain topping (390g). Knead in 30g cornflour or less if dough is too sticky.
To assemble:
about 20g caster sugar, to coat
Using a wooden spoon or an electric mixer with paddle attachment, beat butter and sugar in a large mixing bowl until combined. Add vanilla and egg bit by bit and beat well after each addition.
Sift flour and baking powder into the butter mixture. Use a spatula to fold in gently until just combined.
If you want to make the buns with strawberry melon topping, mix in strawberry jam and pink colouring. Add cornflour and knead lightly if the dough is too sticky to handle. Knead until the dough is just soft pliable and easy to handle. Do not add too much cornflour and over-knead dough.
To assemble, gently deflate the dough and divide it into 12 pieces (about 52g each). Shape each piece into a round smooth ball.
Divide melon topping into a total of 12 portions equally by weight (about 35g). Roll all melon topping portions into flat round discs. Place each disc on each bun and wrap the bun with the topping. Coat topping layer with caster sugar. Use a knife or metal ruler to score criss cross pattern (about 3-4 lines on each side) on the topping.
Line baking trays with baking paper. Arrange each bun with its seam sides down, about 5 cm apart on the prepared baking trays.
Cover the dough with cling wrap and allow them to prove in a warm and humid place for another 1 hr or until doubled in size.
Transfer immediately onto a wire rack to cool completely before serving. These buns are the best on the day they are freshly baked.
Please note that the toppings on the buns won't be crispy on the next day even if you keep the buns in airtight containers. The best way to store is to wrap tightly in plastic wrap and freeze them in serving portions for up to 3 months. To reheat, bake frozen buns in preheated 180°C oven for about 10-15 mins until they are thoroughly warm and the toppings are crispy again. You don't have to thaw the frozen buns before reheating. You will be amazed that the breads will be fluffy soft and moist just like they have been freshly baked.


